Roast Beef with Brown Gravy

Roast Beef with Brown Gravy

Here’s my take on a classic roast which I normally do during weekends… well, not every weekend, but whenever I’ve got time on my hands to spare, that is, when I’m not doing the laundry or the ironing, or not going somewhere for a few errands, or not entertaining friends, or not caring about how my cholesterol would soar up when I eat meat, especially beef.

I have a beef round that has been sitting in my freezer for quite some time now.  And I figured since this was a lazy Saturday, I would have time to spare for a roast.  I have around a kilo of white and red potatoes in the fridge for my mashed potato, and some frozen veggies.  Perfect!

Ingredients:

800 grams to 1 kilo beef round

5 cloves garlic, peeled and halved

Salt and freshly ground pepper to taste

1 teaspoon Knorr liquid seasoning or Worcestershire sauce

1 teaspoon rosemary

1 tablespoon olive oil

50 grams butter

2 tablespoons flour

2 cups beef stock

Direction:

_MG_5267

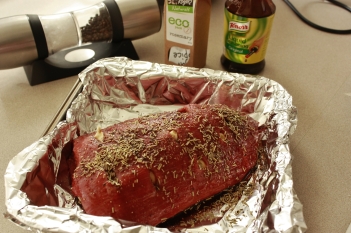
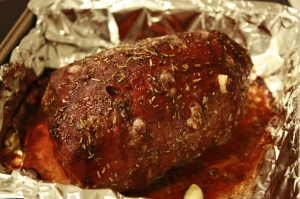
1.  Thaw beef thoroughly, that is, if yours comes from the freezer like mine.  Pat it dry.  Then, using a small knife cut small holes all over the meat.  Insert the garlic pieces into the holes.  Sprinkle meat with salt and freshly ground pepper, liquid seasoning, olive oil and rosemary.  Massage meat for about 1 minute to coat meat properly with the seasonings.  Let the meat stand for at least 2 hours to marinate.

_MG_5270

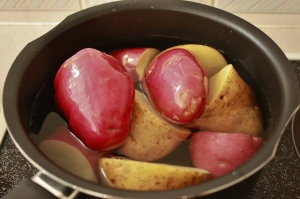
2.  In the meantime, boil the potatoes and get them ready for making mashed potato.  Note that I have my recipe for mashed potato somewhere here in my blog.  Just look it up if you like. 🙂

roast beef

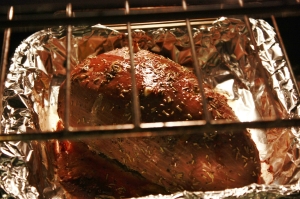
3.  Put marinated meat in the oven and cook at 160°C for 1 hour, then at 250°C for the last 30 minutes.  You can add an extra 30 minutes if you want your roast well done.

_MG_5296

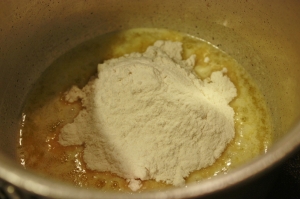
4.  While your meat is cooking, about an hour, start doing your gravy by making a roux out of butter and flour.  Melt butter in a pan.  Add flour.

_MG_5297

5.  Cook the flour in butter until it gives a paste-like consistency.

_MG_5300

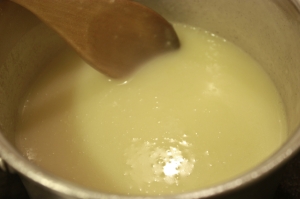
6.  Add 2 cups beef stock and stir, under low heat, until mixture thickens.

_MG_5303

7.  Get the drippings from the roast to mix with the sauce to give it more flavour and to produce brown gravy.

_MG_5304

8.  Pour meat drippings into the sauce.

gravy

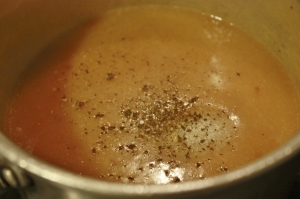
9.  Stir and season gravy with salt and freshly ground black pepper.

brown gravy

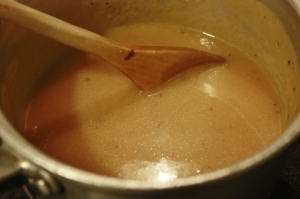
10.  Set gravy aside, keeping it warm.

Roast Beef

11.  Using a sharp knife, cut cooked roast beef into thin slices.

Roast Beef with Brown Gravy

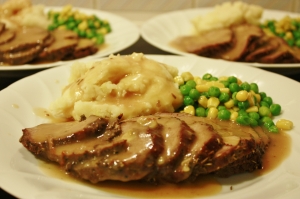
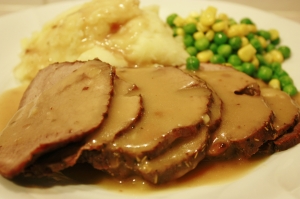
12.  Arrange into individual plates and serve with mashed potato and buttered veggies.

Roast Beef with Gravy

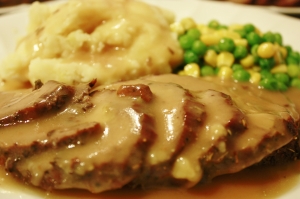
It’s perfect accompanied by usual favorite, a glass of Pinot Noir!

Enjoy! 🙂

Brandied Creme Brulee

Creme Brulee

I first heard of Crème Brulee when I first watched the movie My Best Friend’s Wedding starring Julia Roberts and Cameron Diaz.  It was the scene when Julia describes Cameron’s character as Crème Brulee, “It’s beautiful… it’s sweet… it’s irritatingly perfect.” Then I became aware of its existence when we began serving it in the club where I used to work as food and beverage manager.  But for some reason I didn’t really get to appreciate it until I left the job a few odd years later and learned to do it myself in my cozy little kitchen.

Creme Brulee

Then that’s when I began, not just to like it, but to really, really love it!  Julia Roberts is indeed right.  It’s beautiful.  It’s sweet.  It’s irritatingly perfect!!!

Crème brulee is a French term meaning “burnt cream”, which is understandable from the pictures alone.  I don’t know why, but for some reason I don’t like the flavour or taste of vanilla.  So, if I can avoid it, I always try to substitute it with another flavour or essence.  So, in this recipe of Crème Brulee, I substituted vanilla, some people may not like it, with brandy, or sometimes brandy essence, whichever is available during the time.

And for me, it always turns out perfect!

Ingredients:

9 egg yolks

¾ cup caster sugar (you can reduce your portion if you don’t like it too sweet)

4 cups heavy cream

1 tablespoon brandy or brandy essence or vanilla (whichever you prefer)

Extra sugar for dusting the finished product

Direction:

1.  Preheat oven to 325°F.

2.  Pour cream in a heavy pot and briefly simmer over low heat.

3.  While waiting for the cream to simmer, put together egg yolks and sugar in a bowl.

4.  Cream them using a wire whisk until the mixture turns pale yellow and thick.  Set aside.

5.  When the cream starts to simmer add the brandy or brandy essence into the pot.

6.  Give the cream a few minutes to cool down a little bit.

7.  Gradually add the hot cream, whisking at the same time, into the egg yolk mixture.

8.  Divide custard mixture into ramekins about ¾ full.

9.  Arrange ramekins in an ovenproof dish or roasting pan and fill dish with enough water, about halfway up the sides of the ramekins.

10.  Bake in the oven until custard is barely set around the edges, about 40 minutes.  Remove from the oven and allow custard to cool to room temperature.  Then place the ramekins into the fridge and chill for at least 2 hours.

11.  Take ramekins out of the fridge and sprinkle sugar on top of each chilled custard.

12.  Then using a blow torch and holding it about 2 inches away from the surface, “burn” or brown the sugar to form a crust.

Creme Brulee

13.  Serve Crème Brulee with a chocolate wafer stick or with your favorite fruit.

Beautiful!  Sweet!  Irritatingly perfect!!! 🙂

Angel Hair Pasta with Creamy Tuna, Asparagus and Courgette Sauce

These past few weeks have been really challenging.  Work has been hectic and as I soon as I get home, I barely reach the couch and I doze off oblivious to the noise around me.  Noise means loud music coming from my son’s room with him practicing on his electric guitar to the tune of John Mayer and Gary Clark Jr. songs.  Not that I don’t like this kind of music.  In fact, I like it a lot, but when all you want is peace and quiet, you get to abhor listening to it at times.

And at times like these, I hate going to the kitchen to prepare for dinner.  I mean, if you ask me, I’d rather just skip dinner and head for bed and get back to sleep.  But as a mom and wife who looks forward to bonding moments over dinner with dear son and hubby, this is enough motivation for me to opt for the kitchen instead of the bedroom.

But getting to actually prepare dinner is a totally different story.  Inspiration would elude me and would stand in the middle of the kitchen with absolutely no idea what to do.  I’d grab stuff from the fridge and from the pantry, chop and slice them up, as if in a trance, and start cooking, and still with no idea how the stuff would turn out.

This was one of those days.  I woke up with my son’s voice in my ear saying it was late and that he was hungry.  I got up from the couch, grabbed my camera and let it be a witness to how I would fare on this particular night.

Ingredients:

1 bunch (250 grams) fresh asparagus, cut into ½ inch pieces

2 pieces courgettes, cut into cubes

1 200-gram can tuna chunks

1 400-gram can whole tomatoes, roughly chopped

1 cup fresh cream

500 grams angel hair, cooked according to package instructions

3 tablespoons olive oil

3 cloves garlic, finely chopped

1 medium size onion, finely chopped

1 cup freshly grated parmesan cheese

Salt and freshly ground pepper to taste

Direction:

1.  Heat oil in a non-stick pan and stir-fry garlic and onion until they turn translucent.

2.  Add the asparagus and courgettes and stir-fry for about 2-3 minutes, careful not to overcook them and still maintaining their crunchiness when cooked.

3.  Add the tuna chunks and stir about 1 minute.

4.  Then add in the roughly chopped canned tomatoes and stir.  Turn up heat and allow to boil for about 2 minutes.

5.  Turn up heat and allow to boil for about 2 minutes.  Season with salt and freshly ground pepper.

6.  Pour in the fresh cream and simmer for a few minutes.

7.  Then add ½ cup of the grated parmesan cheese.  Continue to simmer until cheese has melted.  Check seasonings and adjust according to your desired taste.  Turn off heat.

8.  Heat another non-stick pan.  Add a little olive oil and put the cooked angel hair pasta until just about heated through.

9.  Divide pasta into individual plates.  Top with the sauce and sprinkle with the remaining half of the freshly grated parmesan cheese.

10.  Serve with garlic bread.

I was totally surprised with how this dish turned out.  It was absolute yumminess!!!  I served it with re-heated sage and onion panini slices which I bought the previous day.

Over dinner, all I heard from my two boys were their oohs and aahs as they tackled their plates.  Absolutely everything, pasta, sauce and bread, was devoured in seconds!  Was I glad I took the trouble of getting up and doing what I did!  🙂

Spanish-Style Pork Stew (My Version of Fabada)

I love stews on cold nights.  They warm you up inside and out.  Beef stews, chicken stews, pork stews… I love them all.

Here’s my take on a Spanish pork stew, also known as Fabada, named after a certain white bean.  Except that, for some reason, I don’t like beans.  That’s why I don’t eat pork and beans, especially because it has more beans than pork.

But there’s one type of bean that I just love.  It’s the garbanzo bean, also called chickpeas.  So, I decided to do away with the white beans on this recipe and use chickpeas as a substitute.  I also used more pork to make the dish heavier.

Ingredients:

750 grams pork belly, cut into serving portions

4 tablespoons olive oil

4 cloves garlic, finely chopped

1 medium size onion, finely chopped

2 dried chillies, roughly chopped

2 medium size tomatoes, roughly chopped

2 pieces (around 100 grams each) Spanish chorizo

1 400-gram can chickpeas

1 cup soup stock

Salt and freshly ground black pepper to taste

Direction:

1.  Heat olive oil in a large non-stick pan.  Add the garlic, onion, and dried chillies and stir-fry until onion becomes translucent.

2.  Add the pork, stir, then cook for about 5 minutes until pork turns a pale brown in color.

3.  Add the chorizo and stir quickly for about 1 minute.

4.  Then add the tomatoes and cook until they have softened or thoroughly wilted.

5.  Stir in the chickpeas, including its juices.

6.  Add 1 cup of soup stock.

7.  Give it a quick stir and season with salt and freshly ground black pepper.

8.  Bring to the boil, lower the heat, cover, and simmer for about 20-30 minutes, or until the pork is cooked through.

9.  Check seasonings before serving.  Adjust according to your taste.

10.  Spoon the stew in a bowl.

11.  Please note that this stew is heavy on the tummy.  So you might want to serve it with a light salad with a light dressing, or with crusty bread.

I serve mine with a light salad every time.  And it’s made even more perfect with a glass of our favorite Pinot Noir.

Enjoy! 🙂

Grilled Chicken with Garlic Sauce

This dish has been a favorite of mine from many, many years back when I was just starting at Makati Sports Club.  It is no surprise, really, since this has also been, and still is, one of the top favorites of the club members.  I introduced this to my husband when we were just dating, also a long time ago, and this became one of his favorites as well.  Needless to say, this has become a family dinner tradition.  A week wouldn’t pass by without us having this dish either on a weekday or weekend.

There’s no magic in it really.  If you love garlic, then this one is a must-try.  You can either use the breast part of the chicken or the leg part, without the bones.  You can buy chicken steaks in your local meat shop.

Ingredients:

3 chicken steaks or breasts

Salt and pepper

1 teaspoon paprika

½ lemon

1/3 cup olive oil

6 cloves garlic, finely chopped

1 teaspoon Knorr liquid seasoning or Worcestershire sauce

1 big bunch of fresh asparagus (or your choice of vegetable)

Direction:

1.  Rub the chicken steaks with salt, pepper and paprika.  Then squeeze the lemon juice over the steaks.  Massage the chicken steaks a little bit to evenly coat the seasonings.

2.  Heat a non-stick pan.  Then put the steaks and cook over medium heat starting with the skin side.  (This way you wouldn’t have to use cooking oil as the skin’s fat is more than enough to use for cooking the steaks.)  If you are watching your diet, take the skin off the meat and use olive oil instead for cooking.

3.  Allow to cook for about 10 minutes on each side, checking from time to time, and taking care not to overcook or burn the meat.

4.  Drain some of the chicken fat while cooking.  You don’t want your chicken soaking in fat!

5.  In the meantime, prepare the garlic sauce by mixing the olive oil, garlic and liquid seasoning in a pot.  (Please leave some olive oil and garlic to cook the asparagus with.)

6.  Simmer the mixture in very low heat until the garlic is cooked, about 10 minutes.  Or when the garlic starts to turn golden, turn the heat off.

7.  Wash the fresh asparagus and cut off the hard parts.

8.  In the same pan where you cooked the chicken (by this time you would have transferred the chicken steaks in individual plates), wipe off the fat, put a little bit of olive oil, add the garlic, and fry until it turns golden.  Then add the fresh asparagus and stir fry a little bit, about 2 minutes.

9.  Cover for another 2 minutes to give the asparagus a steamed effect.

10.  Spoon garlic sauce over the chicken steaks.  Serve with the asparagus or with your choice of vegetable.

You’ll surely love this, too! 🙂

No-Bake Cheesecake with Blueberry Topping

Not only do I love to cook dinner for family and friends, I also love to bake for them.  I bake cakes, pastries and desserts for special occasions.  I’m quite known in my circle of friends to always be the one to bring in the sweet stuff.  Well, mainly it’s because Mon and Kurt, and myself included, don’t have the sweet tooth, which is just as well because my husband’s side of the family are mostly diabetics.  But I do love to bake.  And it is only during weekend gatherings with friends that I get the chance to vent out my passion for baking. 🙂

And my friends are very grateful recipients of this passion of mine.  They always look forward to what “yummy” treats I would be bringing along.  And it gives me so much pleasure to see their delight whenever they see a cake or a dessert in my box for everybody to enjoy after dinner.

My no-bake cheesecake is a popular favorite.  (Oops, this one needs no baking though. :))  I would serve this with whatever is available or in season.  I’d serve it with yellow mangoes, or a combination of mango and passion fruit, or fresh strawberries, or blueberries.

I did this cheesecake as a gift for a friend’s birthday.  And I used tinned blueberries as topping.  And I normally double my recipe to make 2 cheese cakes.  But the ingredients below are only good for 1 cheesecake.

Ingredients:

200 grams Graham crackers, or any sweet cracker or biscuit of your choice

50 grams softened butter

1 bar Philadelphia cream cheese

1 cup white sugar

1 cup fresh milk

1 ½ tablespoons unsweetened gelatine powder

1 cup fresh cream

1 400-gram tin blueberries in syrup

Direction:

1.  Place crackers or biscuits in a blender or food processor.  I used malt crackers.

2.  Blend or process until smooth.

3.  Transfer into a bowl and add in the butter.

4.  Work through the mixture with your hands until the butter is evenly distributed.

5.  Spread the mixture evenly in a nonstick loose bottom pan using a spoon…

6.  … until smooth.  Then leave pan to chill in the fridge.

7.  Mix the milk and the gelatin powder in a microwavable cup thoroughly, making sure not to leave any lumps in the mixture.

8.  Microwave for about 1 minute.  Stir and set aside to cool.

9.  Cut the cream cheese into small cubes.  Put them in the mixer and beat until smooth.

10.  Add in the sugar and beat around 1 minute or until mixture is smooth.

11.  Then gradually add in the milk and gelatin mixture, beating after each addition.

12.  Add the fresh cream last and beat until all the ingredients are thoroughly blended.

13.  Transfer mixture into the chilled pan with the biscuit base.  Then put back in the fridge to set, about 2 hours minimum.

14.  Meanwhile, pour blueberries in syrup in a pot.  Let boil, then simmer for about 30 minutes.

15.  The sauce is ready when it has reduced to a thicker consistency.  Let stand to cool, then transfer into a bowl and chill in the fridge.

16.  Take the cheesecake out of the loose bottom pan after a minimum of 2 hours, or preferably after leaving it in the fridge overnight.  And this is how perfect it would look like!

17.  Take a slice and serve topped with a tablespoon or two of the blueberry sauce.

Absolutely gorgeous!!!  ENJOY!!! 🙂

Slow-Cooked Lamb Shanks in Red Wine

Lamb dinners have always been considered by my two boys as very special.  For one thing, they know that New Zealand lamb is one of the best, if not the best, in the whole wide world.  We buy it fresh, and it has the mildest and most delicious flavor.  The meat is so tender it could almost melt in your mouth. (Drool!) 🙂

My two boys would hover around the kitchen whenever I cook lamb.  They can hardly wait to devour the whole lot as they smell the aroma of the lamb with the hint of red wine as it cooks slowly in the pot.

Tell you what, there’s nothing so special about the way I cook my lamb.  There’s very few ingredients needed, well, except of course I use New Zealand Pinot Noir which is also one of the best in the world.  (I am just biased, I think. 🙂 )

Well, here’s how I do my lamb!

Ingredients:

2 pieces lamb shanks (around 1 kilogram in weight)

1 cup flour

½ cup olive oil

4 cloves garlic, finely chopped

1 big onion, finely chopped

1 cup red wine

1 400-gram can crushed tomatoes

2 cups beef broth

1 teaspoon Italian herbs

1 tablespoon sugar

Dash of Worcestershire sauce

Salt and freshly ground pepper to taste

1 bunch of fresh asparagus or any vegetable of your choice

Direction:

1.  Sprinkle lamb shanks with salt and freshly ground pepper.  Let stand for at least 30 minutes.

2.  Coat shanks with the flour.

3.  Heat half of the olive oil in a pan.  Brown the shanks on all sides, about 5 minutes on each side.  Set aside.

4.  In a deep pan, heat the remaining half of the olive oil; sauté garlic and onion until they become translucent.

5.  Add 1 cup of the red wine.  You can add ½ cup more if you like. 🙂

6.  Let boil for about 2 minutes.

7.  Add the crushed tomatoes and stir.

8.  Then add the beef broth, Italian herbs, sugar, Worcestershire sauce, salt and freshly ground pepper.  Stir and let boil.

9.  Let the sauce boil for about 2 minutes, then add the browned lamb shanks.  Stir.  Let the mixture boil for another 2 minutes.  Then reduce heat to low and simmer, covered, for about 1 hour to 1 ½ hours.

10.  By this time, the sauce would have already thickened and meat would be so tender it could easily pull away from the bone.  Check seasonings and adjust according to your taste.  Turn off heat.

11.  Meanwhile, steam fresh asparagus in a small amount of water.  Discard the water.  Then add a little olive oil into the asparagus and season with garlic powder, salt and pepper to taste.

12.  Arrange cooked lamb shanks and asparagus in a deep dish.

You can serve this with mashed potato, couscous or rice.  Needless to say, my boys preferred rice on this one.  Mon and I had it with a glass each of New Zealand Pinot Noir, while Kurt had a glass of Coke with it.

And boy, you could just imagine how the dish looked like after we demolished everything.  Not a trace of the sauce was left, not anything, except of course for the bones. 🙂

Fluffy Pancakes

I have been on the lookout for a nice recipe for fluffy pancakes.  I have tried some and have liked some.  But this has got to be the best, the fluffiest, and the most delicious pancake that I have ever tried so far.  I found this recipe on The Search for NZ’s Favourite Recipe.  It uses self-raising flour and yogurt and it just so happened that I have both ingredients in my kitchen at the time, so I gave it a go.

The first time I tried it turned out to be really good but thought it wasn’t thick enough for me as it reminded me of thick crepes.  I dunno, maybe because I didn’t mix the batter well enough, or I over-mixed it.  The second time I did it, though, was perfect!  But I added a teaspoon more of baking powder (I’m not sure if you’re supposed to do it!) and used creamy yoghurt instead of the fat-free yoghurt that I used the first time.

These pancakes are just absolutely divine!  My two boys think so too.  Needless to say, my search for the fluffiest pancake has just come to an end. 🙂

Ingredients:

2 cups self-raising flour

1 teaspoon baking soda

1 teaspoon baking powder (optional)

¼ cup sugar

¼ teaspoon salt

2 cups fresh milk

1 teaspoon vanilla

2 eggs, separated

¼ cup olive oil

½ cup plain unsweetened yoghurt


Topping:

Maple syrup

Whipped cream

Strawberry jam

Roughly chopped walnuts

Direction:

1.  Sift and combine all dry ingredients in a bowl.

2.  Then add in the milk, vanilla, egg yolks, olive oil and yoghurt.

3.  Mix until wet and dry ingredients are well incorporated.

4.  Beat egg whites until soft peaks form.

5.  Then fold in beaten egg whites into the batter.

6.  Heat a non-stick pan on high heat, then turn to low.  Scoop ½ cup of the mixture, and when bubbles form, turn to cook on the other side using a Teflon turner, about 2 minutes on each side.

7.  Do the same with the remaining batter.

8.  This recipe makes about 9 fluffy and yummy pancakes! 🙂

9.  Roll each pancake and place on a plate.  (Got this idea when we ordered pancakes in a restaurant for breakfast one Saturday and it was presented to us like this. 🙂 )  Sprinkle with maple syrup, followed by dollops of whipped cream and strawberry jam.  Then top with coarsely chopped walnuts.

This is perfect with freshly brewed coffee!

Hamburger a la Spongebob’s Krabby Patty

Growing up, my son Kurt must have been Spongebob Squarepants’ no. 1 fan.  He started watching the show since the day he learned to watch television.  The funniest thing is that when I googled Spongebob I discovered that they’re actually the same age!… well, almost.  Spongebob’s original run in US television was on May 1, 1999, while Kurt was born May 31, 1999.  That means Spongebob is older than Kurt by a mere 30 days. 🙂

One of the things that Kurt learned from the show by heart was how Spongebob makes his Krabby Patty sandwich.  Which is why up to this moment, he prefers his hamburger made krabby patty style, but without the onions.  Kurt hates raw onions just like his dad.

And I thought I’d share with you how I prepare our hamburger at home. 🙂  Here’s how:

I grill the patties, with no oil.  The fat from the mince will do its wonderful work. 🙂  (Please note that my recipe for burger patties is found in my post on Grilled Burger Patties.)

While the patties are cooking, I prepare the rest of the ingredients: burger buns, lettuce, sliced tomatoes, sliced pickles, cheese, mustard, mayonnaise, and ketchup.

Then I assemble them.

I slice the cheese and let them join the party.  Wait!… what happened to the other set of buns?  Well, you guessed it right, folks.  Kurt couldn’t wait any longer and grabbed his share. 🙂

This is how I normally prepare Kurt’s burger.

And this is how Mon wants his burger done, with double cheese.

There you go, folks.  Hamburger a la Spongebob’s Krabby Patty! 🙂

Grilled Burger Patties

Burger patties are an essential part of our family menu.  I grill them and we eat them plain with just ketchup, mayonnaise and mustard for afternoon tea.  I grill them and serve them with sautéed onion rings for dinner.  But mostly, I do burger sandwiches for lunch for the three of us at work and at school.

Here’s how I prepare my burger patties.

Ingredients:

1 kilo beef mince

1 medium size onion, finely chopped

1 medium size carrot, grated

2 celery stalks, finely chopped

1 cup bread crumbs

2 whole eggs

1 teaspoon Worcestershire sauce

Salt and freshly ground pepper to taste

Direction:

1.  Assemble all ingredients and prepare them according to instruction.

2.  Combine all ingredients together with the beef mince in a pan.

3.  Using your clean hands work through the mixture until all the ingredients have been thoroughly and evenly distributed.

4.  Let the ingredients rest and settle for a while, about 5 minutes.

5.  Measure according to the weight you want all your patties to weigh.  In my case, a 125-gram patty is just the right size for 1 serving.

6.  Form into balls.

7.  Flatten each ball with your hands or with a patty maker, if you have it.  I have a patty maker but I prefer to do them with my hands.  One recipe normally makes about 12-13 patties.  Then I store them in a container for freezing for future use.  And I only took what I needed for this particular afternoon’s tea.

8.  I heated up a small non-stick pan and grilled 2 patties.  I didn’t need to put oil as the beef mince had enough fat in it already.

9.  Then I arranged shredded cabbage, tomato and cucumber slices on a plate, put the grilled burgers on top, then drizzled ketchup, mayonnaise and mustard on the burgers.

Try them!  They’re really good! 🙂